This is pretty long, but I promise it's actually very easy, and once you do it a couple times you won't even have to think about it. Oh, and, warning: these are humongous pictures in their full sizes. I have a widescreen monitor and you're getting what I usually see.
To do this you need a graphics program a) with layers that b) allows you to set layer blend modes. I use Photoshop, but Gimp will work for this part of it and there's probably other things that will, as well.
Doing this requires taking advantage of the ability to set camera angles in game, which is done with one of the meta keys (control or alt on Windows, and no, I never remember which one til I try) plus any of the numbers 4 through 9. After you set the camera, hitting just the number key will move you again to that angle. There's a separate set for camera-man mode and play mode IIRC; I always use the former, though. As far as I know this should also work in the Mac version but you might want to consult your shortcuts list since I don't know for sure.
Once you've set your scene up, find the angle or angles you like and set the camera before snapping any shots. After you take the shot(s), remove whatever Sim(s) or object(s) you want to do the editing on and take another shot from the same angle(s).
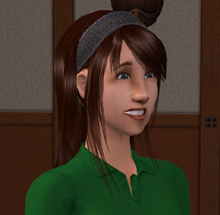
You'll end up with two matching shots like this:

Picture A, with Sims in place

Picture B, with Sims moved from scene
Lather, rinse, repeat as necessary.
When you're ready to edit, open up the pair of pictures in your graphics program, and follow these steps:
* Go to Picture A, select all, and copy.
* Go to Picture B, paste (as a new layer).
* Duplicate both Picture A's layer and Picture B's layer.
* Rearrange the layers as below:
Top layer: Picture B
Next: Picture A
Next: Picture A
Bottom layer: Picture B
* Hide the bottom layer
* Set the top layer's mode to difference.
* Merge the top layer down.
This should leave you with a layer that is mostly black, except for the Sims you're working with and maybe a few minor areas that aren't quite darkened. It should look something like this:

Pick a select tool that will select everything of one colour. In Photoshop, that's the Magic Wand. Set it to pick contiguous only, and auto-select the black part (or parts, if you've got part of the background framed by a loop or through legs, etc.).
If your program lets you tweak selection size, which Photoshop does, this is a good time to shrink the selection area by 1 pixel (Select>Modify>Contract in Photoshop 7), which tends to make the result a little less ragged.
Hide the merged layer. Make the duplicate of Picture A active, and hit Cut.
You should now have something that looks more or less like this:

You'll notice it's still a little ragged (and I left a little bit of background in the fold of an arm, oops). Anti-aliasing selections can help, though sometimes it makes it worse. More likely, once you put manipulate the Sim(s) and put them back in their scene you won't even notice, but a light blur, or a blur tool around the edges on the now-mostly-transparent layer will usually fix it up nicely.
If you get a cut that deletes part of the Sim or object (dark clothes or shadows will sometimes cause this), undo the cut and go back to the merged layer, reselect the black parts, then subtract from the selection around the area. This is usually not too hard.
You can manually cut out anything that's left, like that action queue box marker you can see in mine since I take screen captures instead of pictures. Sometimes there's a tiny change in lighting between the background shot and the regular one, which will leave a few stray lines or dots, but those are easy to see and clean up.
Now what you do is up to you. I often use layering effects, but there's all sorts of changes you can make at this point, solely to the Sims or objects that you've cut out, such as altering brightness, colour, or transparency. For example purposes, I've colour inverted the Sims.
When you're done, you can unhide that bottom layer again, which just contains the original background, and you'll have the full scene again:

Note I didn't bother fixing the flaws (small extra cut from skirt, ragged edges, etc.) but it still looks more or less fine. You can then crop, resize, etc. if you like, or just save as is if you're not me and needing to edit out the pause lines and so forth, giving you the shot you'll use in your story:

And you're done! I promise it will take less time to do than to read about after you go through it once. :)


It's ctrl+4 through 9 to set a camera angle. If you set a camera angle in regular gameplay mode, it'll apply both to gameplay mode and to free camera mode. If you set a camera angle in free camera mode, it'll ONLY work in free camera mode.
ReplyDeleteCool tutorial. I have Corel Photopaint instead, and it's neat to see how other programs work.